33 Smart Home Improvement Tips
- Define Your Goals. Decide exactly what you want to achieve (more space, new style, increased value) and write it down. A clear vision guides every choice, from layout to finish. Ask yourself questions like “How will this improve my daily life?” and “Will this raise home value?”. Having a detailed end-picture helps prevent costly changes later.
- Research and Gather Inspiration. Look for examples online, in magazines or home tours to refine your vision. Save photos or create a board of designs, colors and materials you like. Seeing real examples makes planning easier and ensures everyone (you, family and contractors) shares the same vision.
- Plan Your Budget and Contingency. Set a realistic budget early. Include all costs: materials, labor, permits, furniture, etc. Then pad it by at least 10–20% for surprises. (Hidden problems are common in renovations.) This safety net – sometimes called a contingency fund – keeps the project on track if unexpected repairs or changes arise.
- Create a Project Schedule. Outline each step of the work and how long it should take. Build in extra time for delays (shipping, permits, weather, etc.). For example, don’t plan a renovation right before a big event. A flexible timeline avoids stress and ensures you aren’t rushed at the end of a project.
- Check Permits and Codes. Before beginning, learn what permits your project needs. Major work (moving walls, adding bathrooms, building decks or pools) almost always requires a permit. Small cosmetic jobs (painting, flooring, new cabinets without changing plumbing) often do not. Always verify local rules – skipping permits can lead to stop-work orders and fines.
- Focus on ROI and Priority Projects. Think about how each upgrade pays off. Some renovations (like kitchens or bathrooms) give a bigger return on investment than others. Balance what you want with what adds the most value or usefulness. For example, a fresh kitchen layout may improve daily life and boost resale value more than an elaborate master bath.
- Decide DIY vs. Pro Work. Be honest about your skills. Simple projects (painting, installing shelves, light fixtures) many homeowners can tackle. Complex jobs (major electrical, plumbing, structural changes) usually need pros. There’s no shame in hiring help – it often saves money in the long run by avoiding mistakes.
- Gather Inspiration and Use Tools. Use online design tools or home improvement apps to preview layouts and costs. Tools like floor-plan apps or budgeting calculators can catch potential problems early. Also, collect multiple inspiration images of details (tile patterns, lighting styles, paint colors) to share with your team for clarity.
- Make a Detailed Checklist. List every task and all materials needed before starting. For each step, note down the exact tools, quantity of materials and brands you’ll use. Having a list prevents forgetting crucial items mid-project and avoids last-minute trips to the store.
- Order Extra Supplies. When buying paint, tile, wood, or other materials, purchase 10–20% more than the measured need. Batches may vary in color or texture, so having extra from the same lot avoids mismatched patches later. This buffer accounts for waste, mistakes and future repairs.
- Finish Every Task Fully. Don’t leave details half done. Complete painting edges, caulking, trim, and cleanup before moving on. Finishing tasks completely improves the quality and your satisfaction. It also prevents the inconvenience of returning later to do small fixes that are easy to forget.
- Avoid Shortcuts. Do not take shortcuts that sacrifice quality or safety. For example, ripping out drywall improperly or skipping fastening steps can cause bigger problems later. Investing time and correct methods up front ensures the work is done right the first time.
- Use Proper Safety Gear. Always wear eye protection, gloves and masks as needed. Home projects can create flying dust, splinters or chemical fumes. Safety glasses protect your eyes from debris, and sturdy gloves shield hands from cuts or harsh materials. For loud tools, wear ear protection – power tools can damage hearing over time.
- Keep a Safe Workspace. Maintain good lighting and clear walkways. Dim or cluttered work areas lead to mistakes and injuries. Ensure the area is free of tripping hazards; keep cords, lumber and hardware organized. Restrict kids and pets from the workspace for their safety. A clean, well-lit work zone helps you work faster and safer.
- Read All Instructions First. Before using new tools or installing products, read the manuals. Break tasks into smaller steps in your plan. For example, if tiling a backsplash, watch a how-to video or consult tutorials first. Proper preparation and following instructions reduces errors and rework.
- Maintain Tool Safety. Use each tool as intended. Keep power tools in good condition and unplugged when changing bits or blades. For electrical work, use insulated tools and avoid metal ladders (glass-fiber or wooden ladders are safer around wires). Inspect ladders and cords for damage before use.
- Assemble Your Team Carefully. Get referrals for contractors or specialists. Ask friends, family or neighbors who they’ve hired and if they were happy with the results. Local social media or neighborhood groups can offer recent reviews too. A recommendation from someone you trust is one of the best ways to find reliable help.
- Vet Contractors Thoroughly. Check credentials before hiring. Make sure any contractor is licensed and insured for your type of project. Read online reviews and ask for recent references. If they hesitate to provide references or details, consider it a red flag. It’s worth a little extra time up front to ensure you hire a reputable pro.
- Get Multiple Bids. Always obtain at least three detailed written estimates. Compare them line-by-line: scope of work, materials, timeline, and cleanup responsibilities. Written bids force clarity. Don’t automatically pick the lowest bidder; the cheapest quote may cut corners or have hidden costs.
- Write a Clear Contract. Once you pick a contractor, get everything in writing. The contract should list exactly what work will be done, the materials (including brands), timeline, payment schedule, and any warranties. Having a detailed agreement avoids misunderstandings. For example, specify who handles cleanup and permit pulls.
- Communicate During the Project. Keep in touch with workers. Agree on how often and by what means you’ll get updates. Inspect progress at agreed milestones before releasing payments. Good communication (for example, daily check-ins on changes or issues) keeps the project on track and ensures any concerns are addressed early.
- Watch for Quality and Warranty. Use durable, low-maintenance materials where possible. For instance, choose stain-resistant flooring or long-lasting hardware. Inquire about product warranties – a good warranty can save thousands if something fails. (For example, a lifetime warranty on windows means free repairs or replacement later) Protecting your investment now avoids extra costs later.
- Plan Your Financing Wisely. After budgeting, figure out funding. For small projects, savings or a credit card might work. For larger jobs, consider low-interest loans or renovation financing. Look into special incentives (for example, energy-efficiency rebates for solar panels or insulation). Talk to a loan officer about options like personal loans or home equity lines, and choose the most affordable terms.
- Build an Energy-Efficient Home. Wherever possible, upgrade to energy-saving features. Install Energy Star-rated appliances, LED lighting, smart thermostats, and high-efficiency HVAC systems. Proper insulation (in attic, walls and crawlspaces) and quality windows will lower heating/cooling bills dramatically. These upgrades save money on utilities and often have tax rebates or incentives.
- Go Green with Materials. Use sustainable materials to reduce environmental impact. Bamboo or cork floors are renewable and durable. Choose recycled or reclaimed wood, recycled-glass countertops or low-VOC paints to improve indoor air quality. Also install water-saving faucets, dual-flush toilets or showerheads – saving water cuts bills and helps the planet.
- Make Spaces Multi-Functional. Think about how rooms can serve multiple purposes. In modern life, a home office or workout nook is valuable. During design, consider versatile furniture or movable partitions. For example, a guest room can double as a study with clever storage. Adapting spaces increases your home’s usefulness without extra square footage.
- Brighten Up with Natural Light. Maximize windows and light sources to make rooms feel bigger and cheerier. For example, adding skylights or larger picture windows brings sunlight in. Light colors on walls and reflective finishes (like glossy floors or countertops) enhance brightness. Good lighting improves mood and can even make a small room appear more spacious.
- Focus on Function and Style. Balance beauty with practicality. For example, in a kitchen, use durable countertops and quality cabinetry hardware. Open shelving or glass-front cabinets add visual interest and make things easy to reach. Bold design choices (a bright backsplash, colored cabinets or unique lighting) can make a room pop, but keep them balanced with classic elements so they don’t look dated later.
- Increase Storage Smartly. Integrate storage into your design. Built-in shelves, closet organizers and under-stair cabinets can hide clutter. In the kitchen and bathroom, deep drawers, lazy Susans and vertical dividers make cabinets more efficient. Extra storage adds tremendous everyday convenience and can improve home value by showing the house is well-planned.
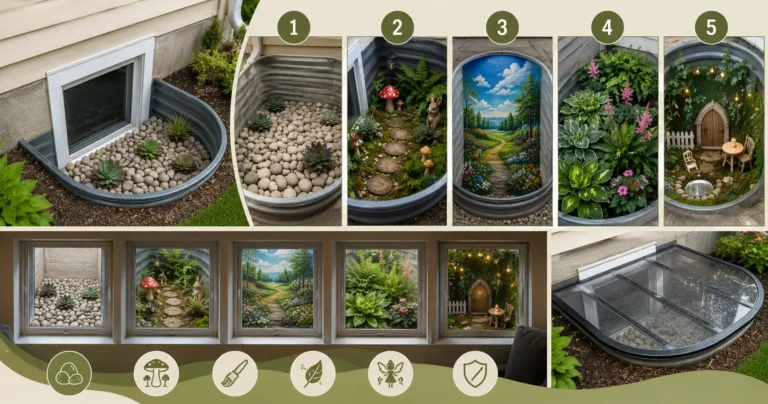
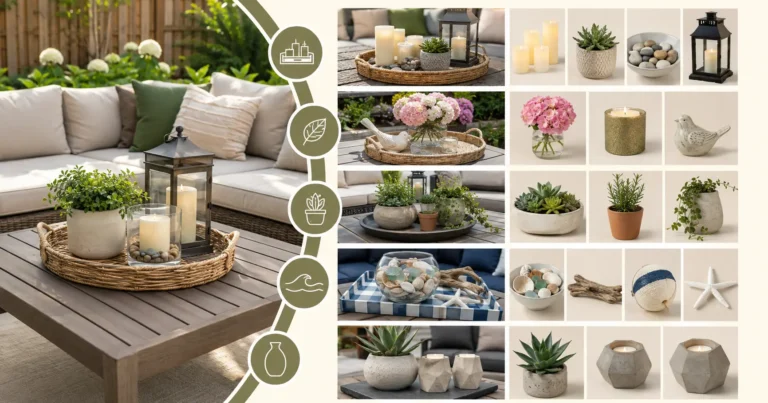
- Boost Curb Appeal and Outdoor Living. Don’t ignore the exterior: a neat lawn, new mulch, or a freshly painted front door immediately boosts home value. Create inviting outdoor spaces – a patio with new pavers or a pergola (as shown above) turns unused yard into living space. Well-maintained decks, lighting and landscaping not only make your home more enjoyable but also add resale value.
- Upgrade Lighting and Paint. Fresh paint and new lighting can transform any room on a modest budget. Neutral, light-colored walls tend to appeal to more buyers and brighten spaces. In kitchens or baths, bright task lighting and clean white cabinetry (see example above) give a fresh, modern look. Accent lighting (like under-cabinet LEDs) can highlight features and improve functionality.
- Embrace Modern Technology. Consider smart-home upgrades for convenience and efficiency. Smart thermostats, app-controlled lighting, or security systems add comfort and can be operated remotely. In the kitchen, touchless faucets or smart appliances save water and energy. Technology investments can make your home stand out and may qualify for rebates or tax credits.
- Final Inspection and Touches. Before declaring the project done, do a thorough walk-through. Fix any missed nail pops, touch up paint, and clean up debris. Make sure all appliances and systems work correctly. Document the changes (take “after” photos and keep receipts). Leave a review for your contractors to help others. Finally, enjoy your improved home – with solid planning and care, your upgrades should delight for years to come!
Related Posts